If you are on this page, It means that you would like to use the novo-map wordpress plugin to create cool custom google maps to display your posts or pages on you wordpress blog. So let’s get straight to the point 😉 .
Install the plugin
Now that the novo-map plugin is on wordpress.org, it will only take a minute to install.
- In the wordpress plugin menu, click on “Add”, search for “Novo-Map” and click on “Install”.
- You can also simply download the zip folder of the plugin on wordpress.org and upload it from you plugin wordpress menu or you also can directly upload the plugin to the “/wp-content/plugins/” folder using FTP.
- When it’s done, you should see novo-map in you plugin menu and you just need to click on “activate”
Main plugin menu
Once the plugin is activated, a new “Novo-Map” menu will show up in you wordpress admin panel. Then just click on “Novo-Map”.
You are now in the main plugin menu where you will be able to create and customize as many maps as you want to insert in you website. Now I’ll go in details over every parameters of the menu :
Basic options
 The first important step is to create your API key to use google maps. for this you just need to click on “get an API key” and follow google’s instructions (you will need to enter your billing information. But don’t worry, you are entitled to 28’000 map displays/month for free which is more than enough for most users). It’s a compulsory step but it won’t take more than 2 minutes. Once you have your API key, just copy it in the field and click “Save API key”
- Now in the list below, select “Create a new Map”
You’re now in the main menu of your 1st Novo-map. Let’s go over each options :
 Map Name : It’s the name you would like to give to your map. It should be unique and describe the context in which the map will be used.
- Map Width : You can define it in % (for instance “90%”) or in pixels (for instance “500px”).
- Map Height : It can only be defined in pixels (for example “300px“).
- Center Latitude : It’s the google map center latitude . You just need to click on the desired spot in the map preview to automatically prefill this field.
- Center Longitude : The map center longitude
- Default Zoom : The map default zoom when it’s loaded.
- Map type control menu : You can choose if you want or not to add a map type control menu and wher it should be displayed on the map.
- Zoom button : You also can add a zoom button and choose its position on the map.
- Category : In this menu, you can select a specific category to filter the posts you want to show on your map. For the moment, you can only filter on category or one tag per map. If you want to display all your posts or pages, just leave it empty.
- Tag : Same as category but for tags.
- Map style :
 This text-area is quite interesting because it allows you to define your own map style (By default it will be prefilled with the style you see in the preview). Well… don’t panic if you don’t understand what’s written in the text-area, you actually just need to go on Snazzy Maps, browse through all the existing styles, choose one that you like, copy the JSON code in the text-area and that’s it!
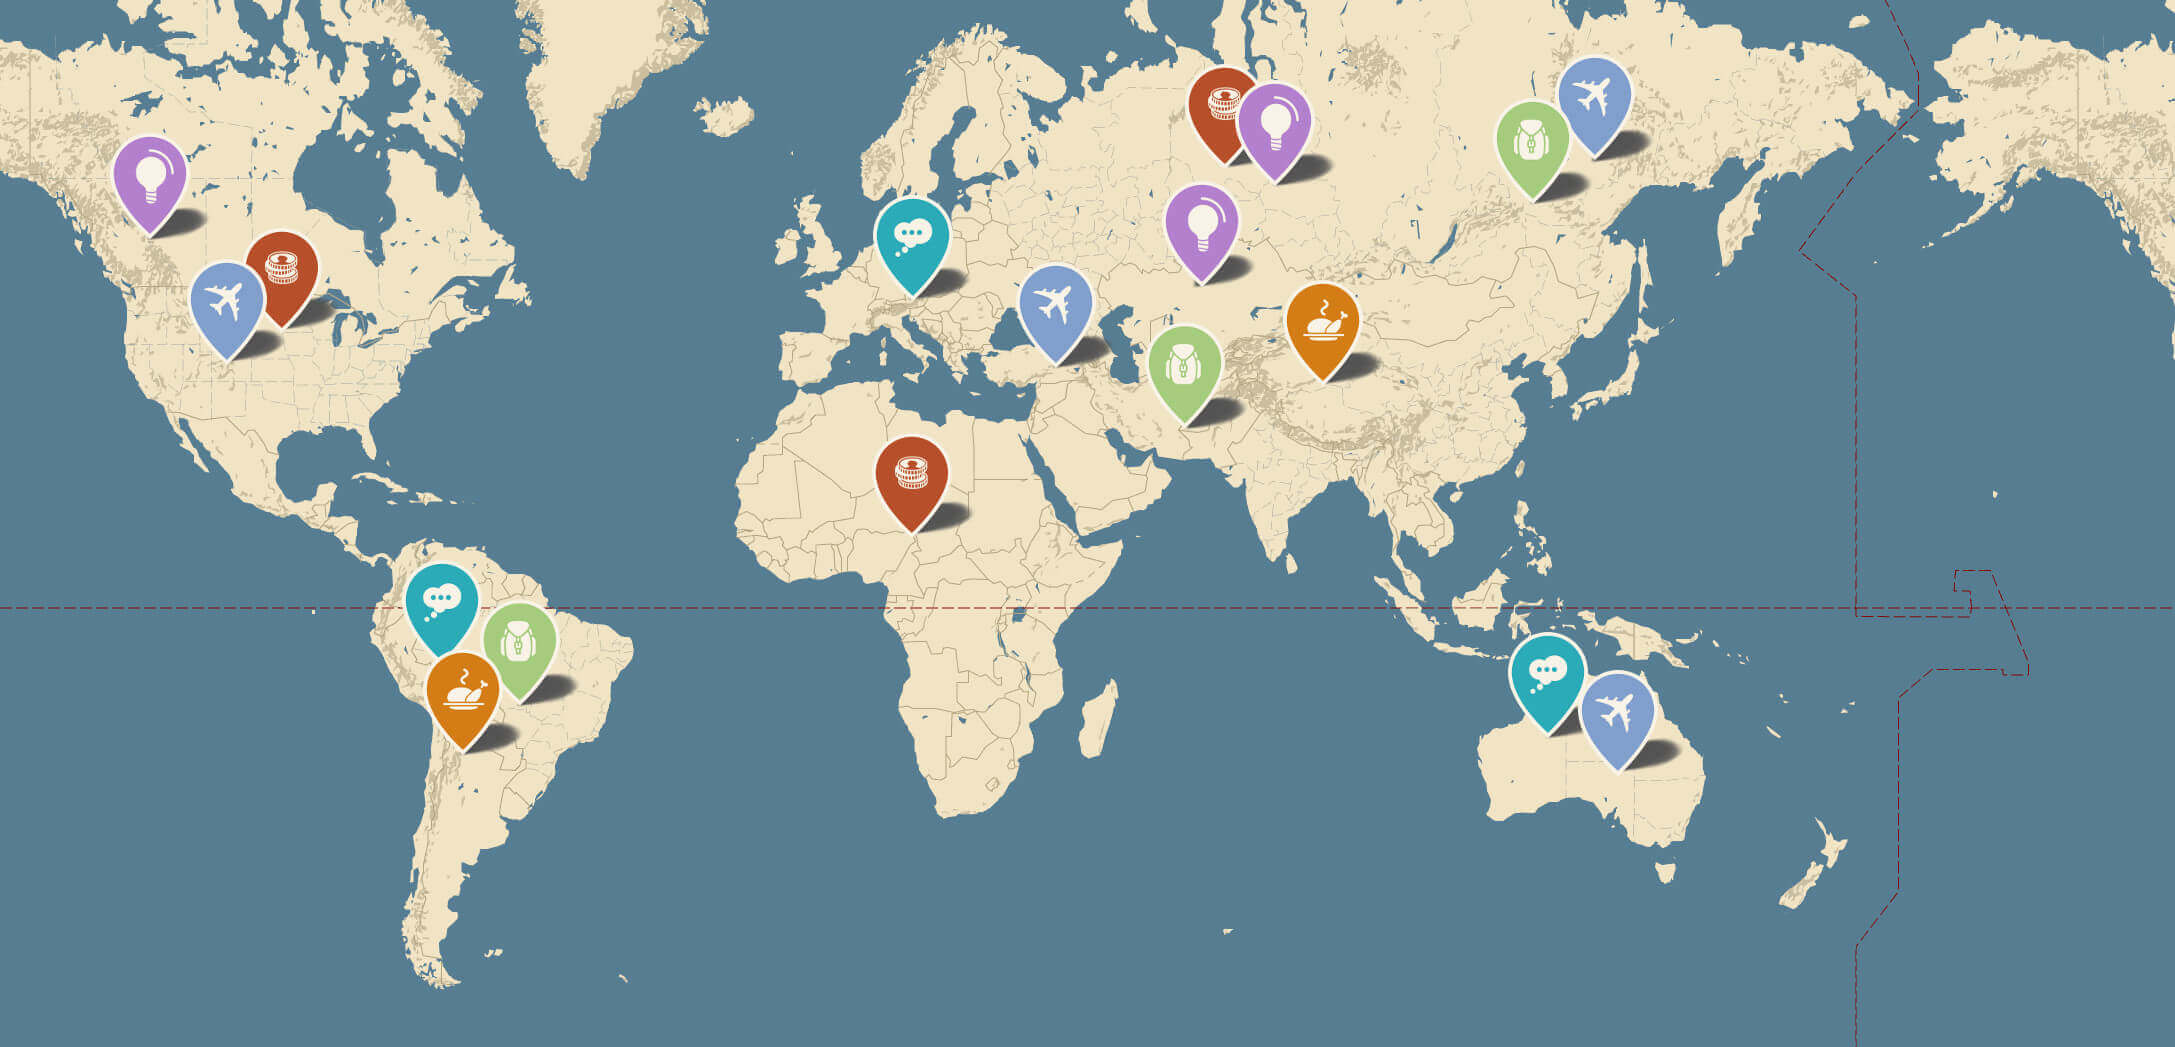
If you need a complete custom style for your site, you can easily create your own style on Snazzy Maps or google map style to perfectly integrate your maps on your wordpress blog. Actually, that’s what we did on the categories pages of our blog novo-monde.
Once your map is saved, you will be able to see what it looks like in the map preview.
Pins clustering
The pins clustering allows you to cluster all your markers that are too close to each other. These pins will be replaced with one marker indicating the number of pins being clustered. If you click on one of those markers, the map will automatically zoom to display all clustered markers.
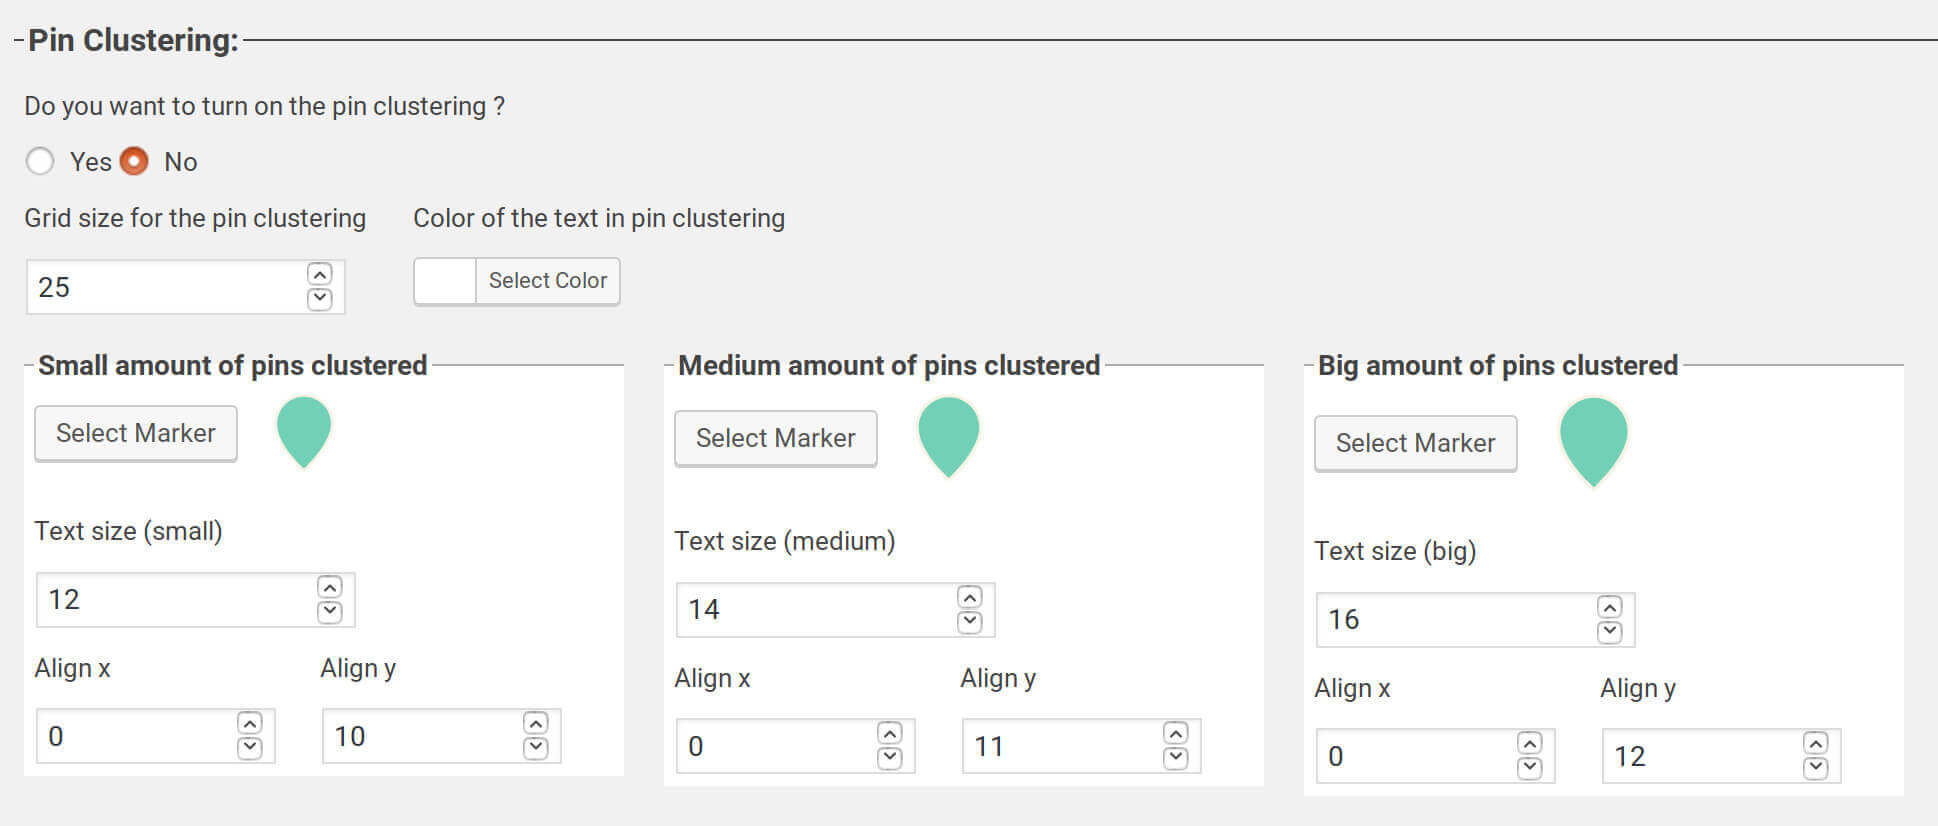
To activate this functionality, just select “Yes” in the first option and everything should already work by default. Let’s check noe together all the different options available for the marker clustering :
- Grid Size : It’s the size of the square used to cluster close markers together. The bigger this parameter is, the more markers will be clustered together
- Text Color : It simply is the color of the number displayed inside the marker.
- Markers menu : You can see the 3 similar menus where you can define if you want to (default options are working very well in my opinion) your own markers for the clustering. If there are 3 menus it’s because there are 3 different sizes… If there are only a few markers clustered, the chosen parameters will be the one on the left, a medium amount, the one in the middle, and a lot of markers will be the one on the right. This way, it will allow your readers to easily see where are more markers clustered. Let’s go over the different parameters together:
- Select Marker : We will talk about marker creation later but just click on this button and you will be able to select on of the default markers shipped with the plugin. For now, just keep the default image.
- Text Size : It is the size of the number displayed inside the marker. The idea is to have a smaller size if the number of clustered marker is small and a bigger size if there are more markers clustered.
- Align X : Allows you to align the number with the marker on the horizontal axis (useful if markers are not symmetrical)
- Align Y : Align the number with the marker in the vertical axis. As our default markers are not symmetrical in the vertical axis, we had to setup this parameter to display the number in the center of the marker.
Additional Marker
This option allows you to add an additional marker which is not necessarily related to a post or a page on you google map (it can be used to display your current position for example). As we are traveling quite a lot, we are using this option to inform our readers live where we are on the map.

- First of all, choose if you want to add or not an additional marker. Click on “Yes” if you like to.
- Title : Choose a marker title for instance : “We are now in Switzerland discovering the alps” . The title will be displayed when on marker hover.
- Marker : Select the marker you’d like to use in the menu (We’ll come back to marker creation a bit later).
- Latitude / Longitude : Just click on the desired spot on the map to automatically prefill these 2 parameters
Additional Options
- Load map scripts : You should alway choose “Yes” by default. For developers, this option will allow you to directly integrate novo-map in you theme for more flexibility (I will come back to this a bit later)
Once you’ve filled all your desired options, click on “Create Map” to save you first novo-map (that you can now see in the preview). Your new google map is now available in the list at the beginning of the menu. If you like to create a new map, you can just select in the list “Create a new map” and start over the whole process.
Geolocate your articles or pages
Create a novo-map is nice but for the moment you don’t have any pin on your map. But to display your articles on the map, you first need to geolocate them. Well it’s really easy to do. Just go to the desired post edit menu and you should see a new “Novo-Map” menu at the end of it that looks like this:
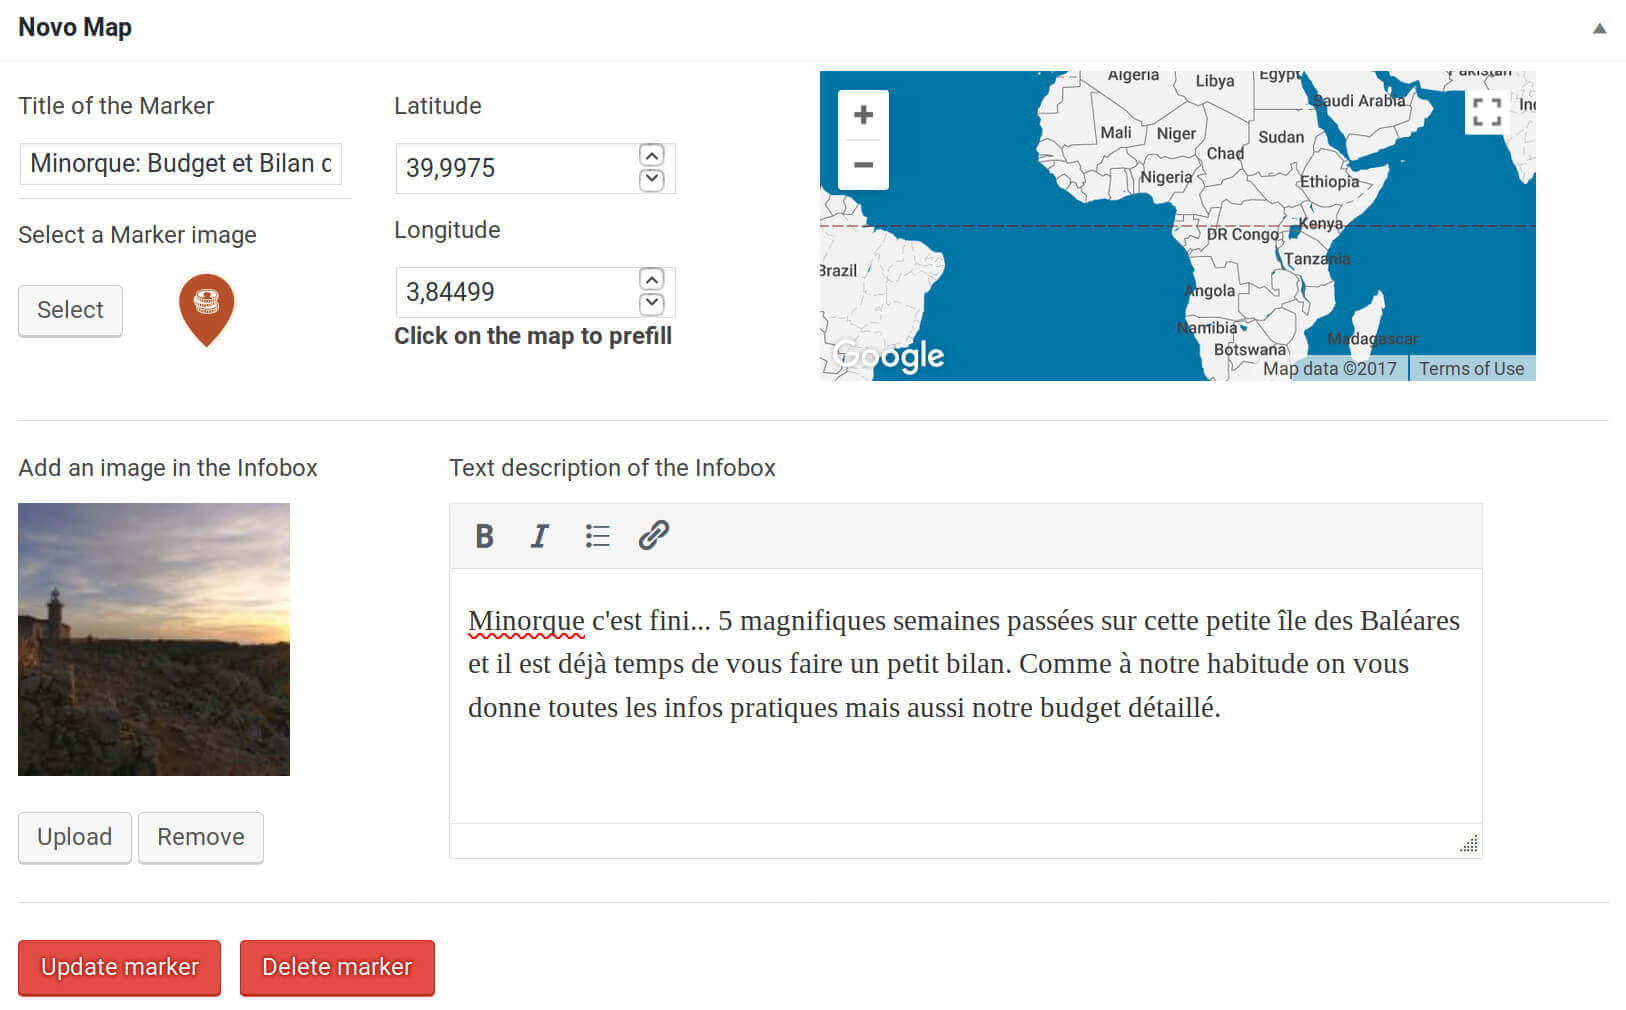 By default, title, image and description are prefilled with your post title, featured image and post excerpt if defined. Let’s go over this menu together :
- Title :It will be displayed on marker hover. It is also used as a title link inside the infobox that is displayed on marker click
- Marker : Just choose the marker you like for this post in the menu (we will come back to custom marker creation a bit later).
- Latitude / Longitude : Just click on the desired spot on the map to prefill these 2 parameters
- Image : The image that is displayed inside the infobox when a reader click on the marker.
- Description : The description displayed inside the infobox. You can write whatever you like, add links, display characters in bold or italic and so on…
When you’re finished, just click on “Add Marker” to geolocate this article or page. You just need to do this operation for every post (or page) you would like to display on the map.
Markers Menu
How to custom markers
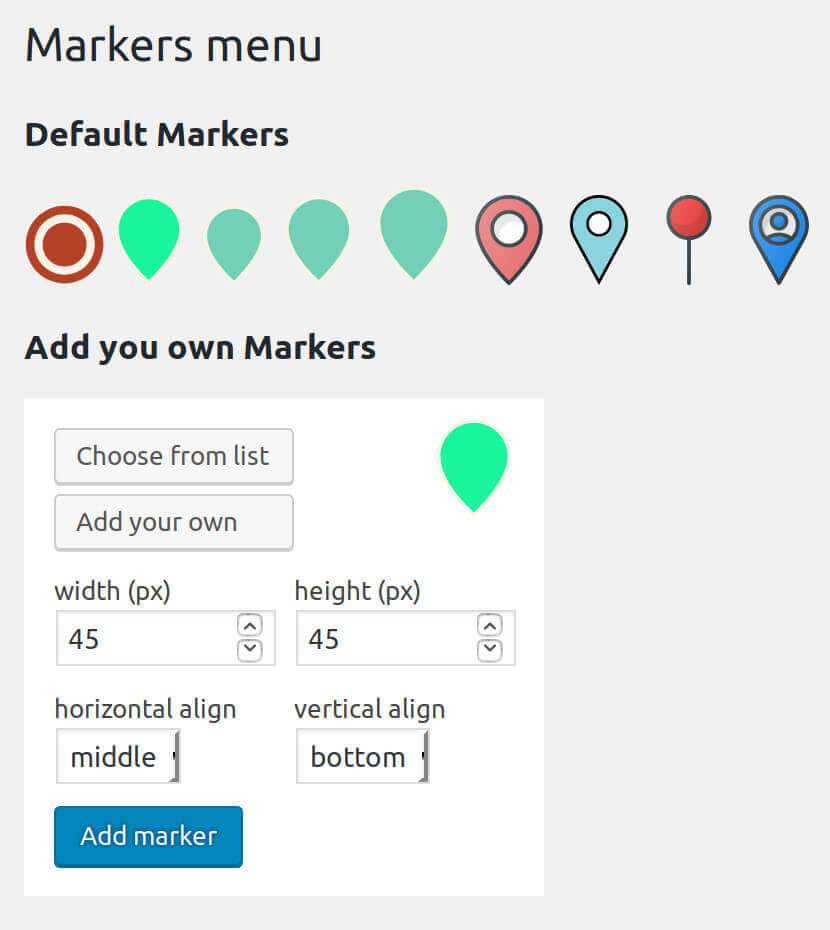
I already mentioned several times that I would explain you how to create your own custom markers to be used in you posts / pages, for the marker clustering or for the additional marker. Don’t worry it’s really easy. you just have to go to the “Markers” submenu (just below the “Novo-Map” menu). The first time you open this menu, it should look like the picture on the right.
You should recognize the default markers you’ve seen in the other menus. But now, let’s see how to create custom markers :
- You should first choose an image for your marker. You can choose one of the images shipped with the plugin (by clicking on choose from list) or choose your own image in your wordpress gallery by clicking Add your own.
- Width / Height : The width and height used to display the marker on the map. It means you can for example use 2 times the same image to create 2 markers of different size.
- Horizontal / Vertical align : Align the marker with the exact latitude and longitude position. For instance, for a standard pin, You would like it to be centered horizontally ans that it’s bottom part to be exactly on the position vertically.
- Once you’re finished, just click on “Add marker” and you’ll see your first custom marker in the menu.
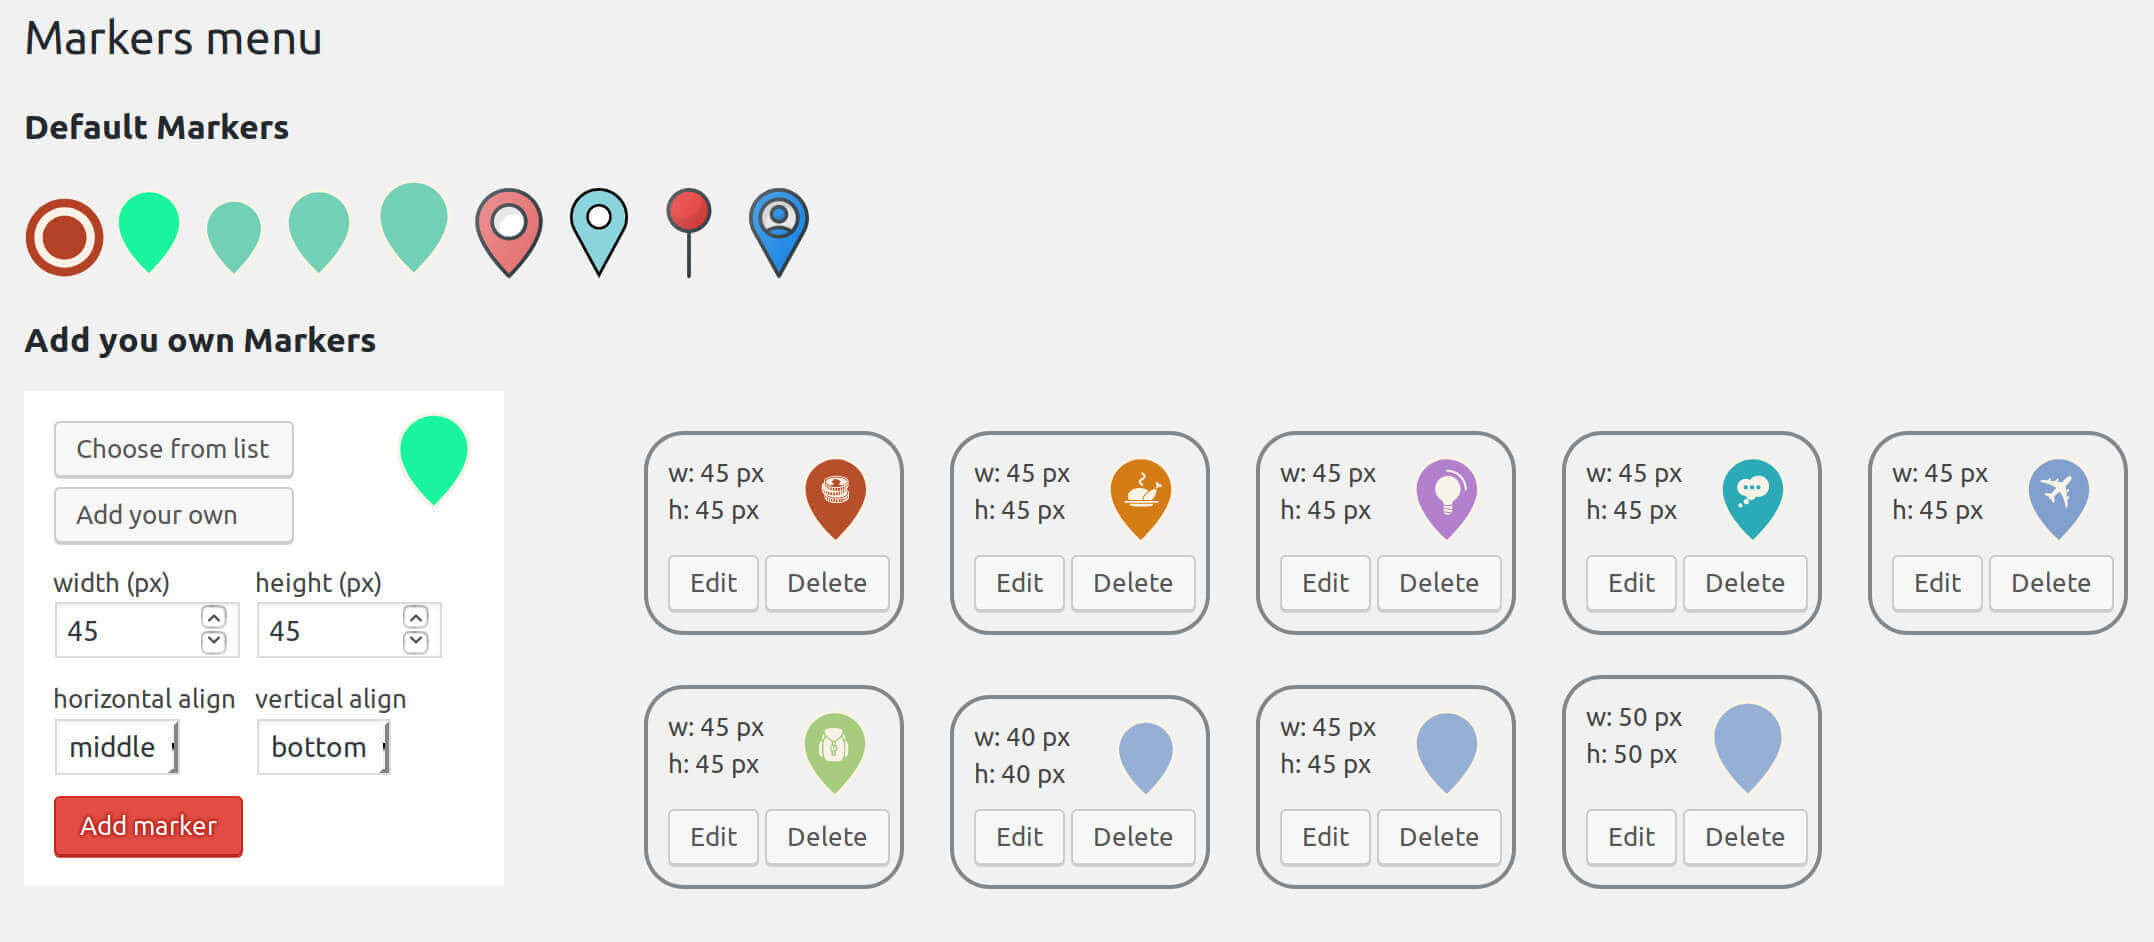
Just to give you an idea, here is what the menu looks like on our travel blog after adding 6 markers for posts and 3 specific one for pins clustering :
Tips to create cool markers
- If you use .png images, ensure that these images are 2 times bigger than the width and height defined inthe marker. This way, your markers will also look nice on retina display.
- The best format for markers images are vectorial images or .svg (because they look good for every sizes and screens). Unfortunately, for security reason, wordpress does not allow to upload this type of images in the media library. On our travel blog, we use .svg markers that we have been able to upload easily using the Safe SVG plugin that we recommend you.
- Be careful if you create your own marker for the pin clustering. Because the marker clustering library does not support stretched icons, you have to create you images with the same height and width defined in the marker. It’s easy for .png images but they will then not look so nice on retina display. If you use vectorial images, you have to define within the svg tag a
width="50px" height="50px"for a marker with a defined width and height of 50px.
Display your Novo-Map on your site
There are 3 ways to display a novo-map on your site which are widget, shortcodes and the developer’s way. Let’s start with the widget.
Gutenberg block
In the new Gutenberg text editor, you can easily add a map thanks to the novo-map block. This block allows you to easily choose and display a map you have created. Moreover the block allows you to change some default settings of your map (a bit like the shortcode). So you will be able to change the width, height, zoom, center of the map, menus… only for this specific block. Also, thanks to WordPress’ new text editor, you’ll see these changes displayed in real time in your editor.
Widget
With the novo-map widget, you can easily add a novo-map anywhere you can attach a widget. Just go to your widget menu, attach the novo-map widget somewhere on your site and choose the map you want to display. Nothing else 😉
Shortcodes
Maybe you already saw that once a new map is created, a shortcode appears at the end of the novo-map menu. Well, you just need to paste this shortcode anywhere on your site to display this map. Easy no ?
But shortcodes can do even more! Let’s say you have defined a map displaying all you articles. you would like to display this map in big inside an article and in your sidebar. But perhaps the define latitude and longitude are not ideal for both case, maybe you have the same problem with the default zoom… Well with the shortcode you can actually overwrite some defined parameters. By default, you would use the shortcode this way :
[novo-map id=1]
But you actually could overwrite some parameters by adding them after the id. Here are the available parameters :
[novo-map id=1 name="newNom" width="500px" height="400px" category="catégoryID" tag="tagID" latitude="newLatitude" longitude="newLongitude" zoom="newZoom"]
If you decide to overwrite a category or a tag, you only can chose one of them… not both at the same time.
The developers way
This concerns mainly developers and allows to integrate nicely novo-map within any theme thanks to the hooks system of wordpress. In fact we used this technique to integrate novo-map on all our category pages defining only one map for all our categories.
First you should deactivate the “Load Scripts” in the novo-map menu by selecting “No”. Then, you can just use the following example in your theme :
add_action('your_wordpress_hook', 'your_function_callback');

function your_function_callback() {

require_once WP_PLUGIN_DIR . '/novo-map/includes/class-novo-map-gmap.php';

require_once WP_PLUGIN_DIR . '/novo-map/includes/class-novo-map-gmap-manager.php';

global $wpdb;

$gmap_manager = new \Gmap_Manager($wpdb);

$gmap = $gmap_manager->get(IDofyourmap);

$gmap->set_category(categoryID);

$gmap->set_name('novomapname');

$gmap->set_latitude(latitude);

$gmap->set_longitude(longitude);

$gmap->set_zoom(newZoom);

echo '<div class="novomap-map-wrap"><div id="novomapname"></div></div>';

$gmap->enqueue_map('novo-map');

}
All the so called “setters” (set_…) are optionals and allows you to modify the map before it is generated.
Filters
novo_map_allowed_post_type: By default, the novo-map menu is only enabled for posts and pages. But you can simply and the following filter in your theme functions.php file to customize this. Here is an example with a testimonial custom post type:
add_filter( 'novo_map_allowed_post_type', 'novo_map_post_types' );

function novo_map_post_types($types) {

$types = array( 'post', 'page', 'testimonial' );

return $types;

}
Important Notice
For the people who used the old version of the novo-map plugin before it was available on the wordpress plugin directory in November 2017. I really advise you to deactivate and uninstall the plugin to install the new version from wordpress.org . Even if you will have to geolocate again all your posts or pages (we had to do the same on our blog and it took less than 2 hours for almost 300 posts), the new plugin is MUCH better and you will get updates directly through wordpress.
Conclusions
Voilà, You know everything there is to know about the new novo-map wordpress plugin. I really hope this user guide will help you to get started quickly with the plugin. And if you have any ideas, commentss or you detect any bug, I invite you to create a ticket in the plugin support on wordpress.org. This way, everything will be in the same place and it will be easier for me to improve the plugin based on your recommendations.
And if you like the novo-map plugin, we would really appreciate if you could donate some money to help us maintain and improve it. I mentioned it already but, donate some money to plugin developers is very important as it encourages free plugin development, keeps the wordpress community open and helps it grow.
Donate for the novo-map plugin
You can also give us 5 little stars and let us a review on the wordpress review page of the plugin. This is a very simple attention that will show us your support and help us share the novo-map plugin on the web.
Thanks a lot
 The first important step is to create your API key to use google maps. for this you just need to click on “get an API key” and follow google’s instructions (you will need to enter your billing information. But don’t worry, you are entitled to
  Map Name : It’s the name you would like to give to your map. It should be unique and describe the context in which the map will be used.
 This text-area is quite interesting because it allows you to define your own map style (By default it will be prefilled with the style you see in the preview). Well… don’t panic if you don’t understand what’s written in the text-area, you actually just need to go on